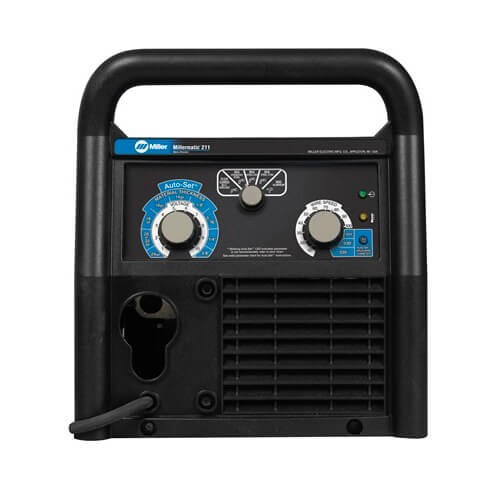
Miller Millermatic 211 Mig Welder w/ Advanced Autoset (907614)
Miller Millermatic 211 Mig Welder w/ Advanced Autoset (907614)

Welding type:

MIG
Power supply:

110V

220V Single Phase
Material type:

Mild Steel

Stainless Steel


The Millermatic 211 Auto-Set 110/220 Volt MIG welder is Miller's most versatile single-phase MIG welder. A best-in-class welding machine, it also has excellent value & versatility. Plug into a standard 120V household outlet to weld steel up to 3/16" or aluminum up to 1/8". Need more juice? Plug into a 220/240V outlet to weld up to 3/8" steel and aluminum. Auto-set features make setup a breeze - just enter your material thickness, welding type and wire feed speed and you're ready to weld.
Download literature of this machine:

As with the previous model 211, the updated model has a Multi-Voltage Plug (MVP) that allows you to connect to either 120 or 230 V power receptacles without the use of any tools.
Your in-stock items ship same or next day from our five distribution hubs in WI and IL via fast UPS Ground. Need special shipping? Just call 1-844-682-0205 - we accommodate any request, including using your shipping accounts. Enjoy hassle-free 14-day returns on new, sealed products. Count on exceptional service backed by industry-leading shipping and return policies. Experience the advantage on your next order!

Welders Supply Company offers the best price for this best-selling single Miller Mig Welder.
Specifications - Millermatic 211 Auto-Set #907614 | |
|---|---|
| Brand | Miller Electric |
| Model | Millermatic 211 |
| SKU | 907614 |
| Processes | MIG (GMAW) Welding Flux Cored (FCAW) Welding |
| Current Type | DC |
| Input Power | 240 V, 25 A, 60 Hz, 1-Phase 120 V, 20 A, 60 Hz, 1-Phase |
| Rated Output | 120 V: 115 A at 19.8 VDC, 20% duty cycle 240 V:150 A at 21.5 VDC, 40% duty cycle |
| Amperage Range | 30 A - 230 A |
| Max Open Circuit Voltage | 54 VDC |
| Net Height | 12.5 in |
| Net Length | 20.5 in |
| Net Width | 11.25 in |
| Net Weight | 38 lbs |
| Portability | Handle(s) Running Gear / Cart (Standard) |
| Industries Interests | DIY / Home Hobbyist Farm and Ranch Metal Art / Sculptures Auto / Cycle (Racing, Customizing, Restoring) |
| Weldable Metals | Mild Steel Stainless Steel Aluminum |
| Material Thickness | Mild Steel 24 ga - 0.375 in Aluminum 18 ga - 0.375 in |
| Wire Feed Speed | 1.5 m/min - 15.2 m/min 60 IPM - 600 IPM |
| Wire Diameter | Solid Steel 0.024 in—0.035 in Stainless 0.024 in—0.035 in Flux Cored 0.03 in—0.045 in Solid Steel 0.6 mm—0.9 mm Stainless 0.6 mm—0.9 mm Flux Cored 0.8 mm—1.2 mm |
| Spool Size | 8 in (203 mm) |
| Warranty | Miller's True Blue Warranty |
Browse all Miller welding machines.
SHIPPING DIMENSIONS |
|
| Height: | 11.00 Inches |
| Width: | 13.00 Inches |
| Length: | 21.00 Inches |
| Weight: | 50 Lb(s) 0 Oz |
Review the instructions for important safety information before using your Millermatic 211 welding machine. Ensure you are wearing OSHA-approved personal protective equipment during setup, maintenance and welding. A helmet with at least a shade 10 lens is recommended.
Pull the work lead out of the access hole on the front of the machine. Locate the control cable connection on the inside of the door, under the drive. Route the control cable through the access hole and connect the cable to the four-pin connection, twisting the collar to secure it in place.
Insert the MIG gun into the drive casting, making sure it is completely seated into the drive assembly. Tighten the threaded T-knob. For aluminum welding, instructions are provided for installing the optional Spoolmate 100 spool gun.
Route the work lead through the work clamp, connect, and tighten securely. Ensure the work cable is connected to the negative output terminal for solid wire with shielding gas.
Choose the appropriate gas (75/25 mix, 100% CO2, tri-mix for stainless steel, 100% argon for aluminum). Connect the gas hose to the regulator and machine, purge the gas cylinder, and secure connections.
Select the correct drive roll groove based on wire size. Place the wire spool on the shaft, thread the wire through the inlet guide and MIG gun liner, and adjust tension settings.
Plug in and power on the machine, avoiding extension cords if possible. Feed the wire through the gun, select the appropriate contact tip, and adjust the drive roll tension.
Use the parameter chart inside the door for initial settings. Utilize the Auto-Set feature on Millermatic 141 and 190 for mild steel and 75/25 gas, and the Advanced Auto-Set on Millermatic 211 for various materials and gases.
Use 100% argon gas and follow similar installation steps as the MIG gun. The spool gun holds the wire spool and automatically detects when the trigger is pulled, with no need for a spool gun switch.
Video: Setting up your Millermatic 141, 190 or 211 MIG welder