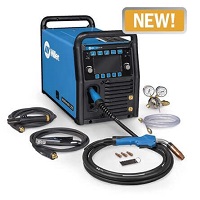
Miller Multimatic 255 Multiprocess Welder 907728

Welding type:

MIG
Power supply:

220V Single Phase

460V
Material type:

Mild Steel

Stainless Steel


The Miller Multimatic® 255 multi-process welder is a 350 amp portable welder. It is capable of DC Pulsed TIG, DC TIG, Stick, MIG and Pulsed MIG welding. This welder comes with a 7 inch LCD screen display with Auto-Set™ Elite technology capable of setting TIG, Stick and MIG parameters requiring only the metal thickness and welding wire or tungsten electrode diameter. The 255 also is capable of storing your custom welding programs, effortlessly switching between welding with a standard MIG gun or an optional Spoolmatic™ spool gun. It also includes direct plug for XR push-pull gun for professional wire feed.
 Running on 208-575 volt input power, the Miller Multimatic® 255 uses Millers Auto-Line technology to automatically detect input voltage. The 255 comes complete with:
Multiprocess Capabilities of MIG, Pulsed MIG, Stick (6010), DC Lift Arc TIG and DC Pulsed TIG
7-inch color LCD display ensures proper machine setup and parameter selection, reducing setup time and increasing weld time.
Lower heat input for less distortion on thin materials, less spatter minimizes post-weld grinding and rework allowing more welding time. Perform welding applications that couldn’t be done in the past
Offers predefined weld settings to increase ease of use and ensure that the job is done right for operators of all skill levels.
Deliver more productivity, consistent quality by welders of all skill levels by using prequalified weld settings. Minimize supervisor need to intervene.
AccuLock liner loads from the front and locks at the front and back to ensure proper alignment for flawless wire feed path. New rubber overmold and ball-and-socket handle design improves grip and reduces welder fatigue. New Industrial Bernard AccuLock™ S contact tips provide superior Spray and Pulsed MIG arc performance.
Weight is reduced by more than 50 percent compared to transformer welding machines. A lighter machine allows for increased mobility to those hard to access spots.
Operators no longer need to use lift truck to load machine and running gear into the truck. Latches secure machine to running gear. Simply loosen the latch retaining knob and rotate latches to disengage machine from running gear for easy portability
| Multimatic® 255 Multiprocess Welder - 208-575V Specifications | |
|---|---|
| Weldable Metals |
|
| Input Voltage |
|
| Input Phase |
|
| Input Hz |
|
| Input Amperage |
|
| Current Type |
|
| Max Open Circuit Voltage |
|
| Wire Feed Speed |
|
| Weld Output |
|
SHIPPING DIMENSIONS |
|
| Height: | 23.00 Inches |
| Width: | 17.50 Inches |
| Length: | 30.00 Inches |
| Weight: | 105 Lb(s) 0 Oz |
See rating label on unit and check input voltage available at site.
Wire receptacle according to the direct connection method stated below and as shown, and connect plug to receptacle or direct connect power.
Connect green or green/yellow grounding conductor to disconnect device grounding terminal first.
Connect input conductors L1 and L2 to disconnect device line terminals.
Select type and size of over-current protection useing Section 5-2.
Connect plug to receptacle if hard wiring method is not used.
Close and secure door on disconnect device. Follow established lockout/tagout procedures to put unit in service.